How to Install a Ledger Board for a Deck

To meet energy codes, many homes in colder climates are now built with a layer of exterior foam insulation between the siding and sheathing. And when an existing home is re-sided, it's increasingly common to first retrofit it with a wrap of rigid foam panels. While exterior foam insulation offers good thermal performance, it presents a wrinkle when it comes to mounting a deck ledger.
If the foam is less than an inch thick, the wrinkle is minor. That's because the IRC permits a maximum space of 1 inch between the face of the rim board and the back of the ledger (see 2015 IRC, Table R507.2 Fastener Spacing, footnote "h"). You may encounter situations where the home builder installed 1/2-inch structural wall sheathing and covered it with 1/2-inch-thick rigid foam panels, or where the walls are covered with 1-inch-thick rigid foam (with no sheathing); in either case, you can install the ledger directly over the foam because the distance between the back of the ledger and the rim joist doesn't exceed 1 inch.
But the rules change once the thickness of the foam or sheathing-and-foam sandwich exceeds 1 inch. Rigid foam isn't structural, and it compresses as loads are applied to a ledger that has been screwed or bolted through it to the underlying rim board. If the foam is thick, the fasteners will start to bend downward. If those fasteners are screws, they'll be prone to pulling out of the rim; if they're bolts, the bolt holes could become elongated and allow the bolts to pull through the rim board or ledger as the force on the bolts shifts from a shear load to a tension load. As the thickness of the foam increases and the ledger gets farther from the rim it's mounted to, the problem becomes more pronounced.
Generally speaking, the thicker the foam, the greater the challenge to mounting a ledger. In this article, I focus on walls sheathed with rigid foam, but the ledger-mounting systems I describe also work with nonstructural wall claddings, such as fully-adhered manufactured stone, EIFS, and stucco, that are best applied over an entire wall rather than being broken up by a deck ledger and flashing.
Why Not Cut Out the Foam?
The easiest option for fastening ledgers to walls with thick foam on the outside may be to simply remove the foam and install the ledger directly to the rim joist (or over the structural sheathing covering the rim joist). There's nothing unusual about the process; it's the same as removing siding on an existing house to install a ledger. Just think of the foam as extra-thick siding.

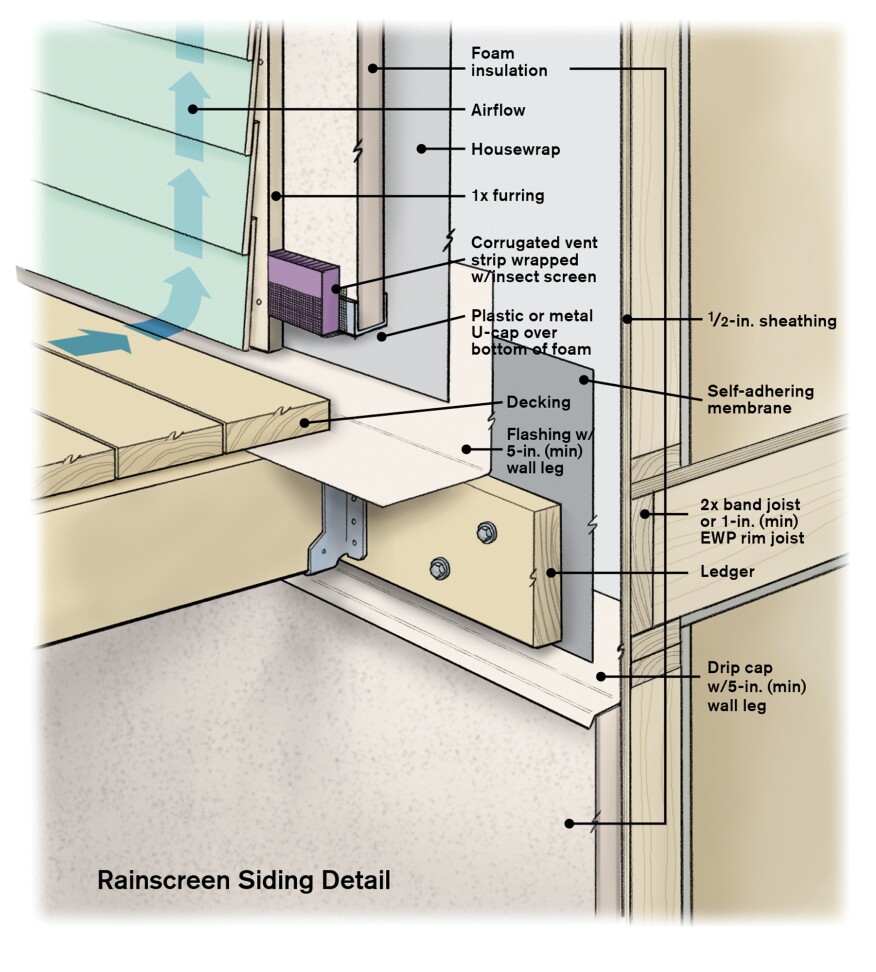
If you choose this approach, the wall leg of the ledger flashing needs to extend behind the foam insulation—I prefer that the leg reach at least 5 inches up the wall. To protect the foam from damage and from burrowing pests, I cap the exposed cut edges with a U-shaped metal or plastic channel with 3/4-inch or longer legs.
Clearance is also needed between the surface of the finish decking material and the insulation. I usually make the clearance space 1/2 inch greater than what the cladding manufacturer requires—for example, for Hardie fiber-cement siding, I cut enough insulation to create a 2 1/2-inch gap above the decking; for vinyl siding, 1 1/4 inches; for wood shingles, 1 inch; and so on. The extra clearance allows the siding to overhang the insulation 1/2 inch and hide the foam edge.

Many walls that have exterior rigid foam insulation also have rainscreen siding, where there is a vented air space between the exterior cladding and the foam. When you're retrofitting a ledger onto a rainscreen-style wall, it's critical to maintain those air spaces both above and below the deck surface (see illustration, above).
Removing foam comes with a risk in cold climates. Builders add rigid foam insulation to reduce the thermal bridges that studs, plates, and rim joists create. Cutting away the insulation and mounting the ledger directly to the wall short-circuits those efforts. Not only that, the break in the rigid foam may lead to air leakage through the building envelope.

This approach may also lead to a latent durability issue. Rim-joist areas are notoriously difficult to insulate and air-seal adequately from inside the house. Removing the exterior layer of insulation to install a deck ledger increases the risk of condensation on the interior of the rim joist in cold climate zones (zones 5 to 8), which may cause the rim joist and mudsill to eventually decay.
Foam-Insulated Ledgers And Sheathing
Some homes are now framed with insulated rim boards, where the structural rim is inset 1/2 inch to 21/2 inches or more from the exterior wall plane, and the recess is filled with a layer of rigid foam. Because structural sheathing typically covers the wall studs, foam, and mudsill as well as the rim joist, it may not be obvious when an insulated rim board is present, though you will notice the soft foam when you drill a pilot hole for a lag screw or a clearance hole for a through-bolt. But when using structural screws (which don't require pilot holes), you may not notice the foam layer—and could end up connecting a ledger to nothing.

The only way to determine if there is an inset rim joist is to probe with a drill bit before mounting the ledger. If the rigid foam is only 1/2 inch thick and the wall sheathing is only 1/2 inch thick, then the deck ledger can still be installed directly over the sheathing without any additional work (per IRC Table 507.2, referenced above).
In order to mount a deck ledger where the rim joist is insulated with a thicker layer of foam, however, solid wood blocking (essentially a secondary rim board) must be installed between the rim board and the sheathing. The blocking must be fully supported by the mudsill or wall plate at areas where the ledger will be situated.
Ideally, on a new house the framer can skip the insulating foam and flush the rim board with the mudsill in the area where a deck will be mounted. But when a deck is built onto an existing house that already has an insulated rim board, the deck builder has no choice but to remove the structural sheathing and replace the rigid foam with solid blocking before resheathing.
Rigid foam also lurks behind some structural wall panels. Huber Zip R-Sheathing is structural wall sheathing with insulating foam bonded to the back that is applied over wall framing. This sheathing comes in a couple of thicknesses: Zip R3 has 1/2 inch of rigid foam with a total panel thickness of 1 inch, while Zip R6 has 1 inch of rigid foam and a total thickness of 11/2 inches.

Where Zip R3 is installed over a conventional rim board (framed flush with the mudsill or plate), the ledger can be applied directly over it using the prescriptive code fastening schedule because the distance between the face of the ledger and face of the rim board is only 1 inch.
But when Zip R6 is installed, an engineered or alternative ledger-mounting system must be used. Unlike with insulated rim boards, where rigid foam can be replaced with solid blocking, removing the foam on the back of a Zip R6 panel and filling the void with blocking wouldn't comply with code, because the back of the ledger would be spaced farther than the maximum 1 inch permitted by the code when the prescriptive fastening table is used.
Alternative Ledger Mounting Systems
The Maine Deck Bracket and the BR Brick Bracket weren't designed as solutions for mounting deck ledgers on walls with rigid foam insulation, but they do the trick. Both are structural spacers that can bridge about a 4-inch gap between a rim board and a ledger. They can be installed in new construction or retrofit onto existing homes with only a little extra work cutting back the siding and insulation. Because both brackets mainly address vertical loads, lateral load connectors may still also be required.
The Maine Deck Bracket is an H-shaped heavy-duty aluminum extrusion (deckbracket.com). One side of the "H" through-bolts (no screws) to the rim board with 1/2-inch hex-head galvanized bolts; the ledger is then bolted to the other side of the bracket. The web is a 1/4-inch-by-3 3/4-inch bridge that can be insulated and clad around. I've used this bracket on several jobs with foam sheathing and on other challenging ledger installations where the extra space between the ledger and the rim is needed (Figures 1 through 5).
To determine the spacing of the brackets, I first do a deck-load calculation to determine the pounds per linear foot of tributary load on the ledger. Referring to the Maine Deck Bracket's ICC-ES Report, which provides maximum loading information, I divide my calculated number by 1,000 pounds (for a single, 1 1/2-inch rim joist) or 1,160 pounds (for a double, 3-inch-thick rim).
For example, a 12x20 deck with a clear joist span (wall to beam) of 11 feet has a tributary area of 5 1/2 feet by 20 feet, or 110 square feet. The tributary load is therefore 110 sf. x 50 lb./sf. (40-lb. live load + 10-lb. dead load), or 5,500 lb. Dividing 5,500 lb. by 1,000 lb. then yields 5.5 (rounded up to 6). This means that six Maine Deck Brackets, spaced equally along the length of the ledger, would be required for this deck.
Another option is the BR Brick Bracket, which was designed to bridge the space between the wall sheathing and the ledger on homes clad with brick veneer (brbrickbracket.com). While the product has no ICC-ES Report yet, the inventor has had the system tested by an engineering service. These plastic brackets space a deck ledger a little more than 5 inches off the face of the wall sheathing and are installed with through-bolts running through the ledger, the brackets, and the rim board. They can be installed in new construction or on retrofits.

A table (similar to the joist-span table in the IRC) provided by the manufacturer can be used to determine the spacing requirements for the brackets. But before using the brackets, make sure your local building official will accept the manufacturer's independent engineering.

Thick-Foam Solution
When the insulation layer exceeds the capacity of these manufactured brackets, an engineered ledger-mounting design must be employed. One option is the ledger-mounting detail developed several years ago by the Cold Climate Housing Research Center, in Fairbanks, Alaska, as part of its REMOTE building system (see www.cchrc.org/remote-walls, pages 7 to 10). In this system, which can be used with up to a 6-inch-thick layer of insulation, wood ledger spacers that are deep enough to bridge the thickness of the foam are mounted to the wall with through-bolts that run through the ledger, blocking, and rim board. While this is a proven design, a registered design professional will be required to determine the block-and-bolt spacing—as well as any lateral load connections—for each deck.
A similar strategy is to space the ledger off the wall with flat blocks. I've seen deck builders fasten a single (1 1/2-inch) or doubled (3-inch) layer of pressure-treated blocking to the rim board with proprietary structural screws or through-bolts, and then screw the ledger to the blocking with proprietary structural screws. Contractors using the design swear by it, but because there's no sanction for it by screw manufacturers or another authority, the specific design and spacing would need to be determined by a design professional and approved by the local building official. (See "Don't Build Decks That Rot," Mar/Apr 2007.)
Freestanding Is Always An Option
In new construction, it is relatively easy to install a deck ledger directly to a foam-wrapped wall, or to use one of the alternative systems described here. On an existing home, however, my advice is to balance these options against building a freestanding deck. In the long run, cutting into the siding and the exterior foam to install the ledger may be more work than installing the additional footings, posts, and beam needed for a freestanding deck.
How to Install a Ledger Board for a Deck
Source: https://www.jlconline.com/deck-builder/installing-deck-ledgers-over-exterior-insulation_o